Mastering GitOps with Multi-Cluster Deployment Using Hub and Spoke Model

Introduction
In the ever-evolving landscape of cloud-native applications, orchestrating deployments across multiple Kubernetes clusters while maintaining consistency and efficiency can be a daunting task. Enter GitOps — a paradigm that provides a convenient way to manage infrastructure and applications. GitOps can help software development teams simplify deployments of cloud-native applications in real-time as a single source of truth for declarative infrastructure and workloads.
This blog post delves into the power of GitOps, specifically focusing on multi-cluster deployment using the Hub and Spoke model. We'll explore how GitOps principles, coupled with a Hub and Spoke architecture, offer a robust solution for managing diverse and distributed Kubernetes environments.
Benefits of GitOps
Before diving into the specifics of multi-cluster deployment, let's briefly outline the key benefits of adopting GitOps:
Declarative Configuration: GitOps relies on declarative configurations stored in a version-controlled repository. This approach provides a clear, auditable history of changes and ensures a consistent desired state.
Automation: GitOps automates the deployment process by continuously monitoring the repository for changes. This automation streamlines workflows, reduces manual errors, and enables rapid, reliable deployments.
Collaboration and Visibility: GitOps promotes collaboration among teams by centralizing configurations in a shared repository. This centralization enhances visibility, making it easier for teams to collaborate, review changes, and maintain a unified understanding of the system's state.
Hub and Spoke Model
In the context of multi-cluster deployment, the Hub and Spoke model emerges as an efficient architecture. In this model, a central "hub" cluster acts as the control plane, orchestrating deployments to one or more "spoke" clusters. Each spoke cluster represents a distinct environment or workload, allowing for modularity, scalability, and isolation.
Prerequisites
Before you embark on this GitOps journey, ensure the following prerequisites are in place:
Tools Installed:
kubectl
eksctl
AWS CLI
Argo CD CLI
Kubernetes Clusters:
Three Kubernetes clusters: One hub and two spoke clusters.
Access to Kubeconfig files for all clusters.
EKS Clusters Creation
Hub Cluster (hub-cluster)
eksctl create cluster --name hub-cluster --region ap-south-1
Description:
- The command creates an EKS cluster named
hub-clusterin theap-south-1region.
- The command creates an EKS cluster named
Hub Cluster Significance:
- The hub cluster acts as the centralized control plane, managing and orchestrating deployments across multiple spoke clusters.
Spoke Cluster 1 (spoke-cluster-1)
eksctl create cluster --name spoke-cluster-1 --region ap-south-1
Description:
- This command establishes the first spoke cluster, named
spoke-cluster-1, in theap-south-1region.
- This command establishes the first spoke cluster, named
Spoke Cluster Purpose:
- Spoke clusters represent individual environments or workloads that benefit from centralized management provided by the hub cluster.
Spoke Cluster 2 (spoke-cluster-2)
eksctl create cluster --name spoke-cluster-2 --region ap-south-1
Description:
- The command creates the second spoke cluster, named
spoke-cluster-2, also in theap-south-1region.
- The command creates the second spoke cluster, named
Expanding Scalability:
- Multiple spoke clusters enhance scalability and isolation, accommodating diverse application requirements.
Setting kubectl Context to Hub Cluster
- This commands helps to identify the hub cluster context within the specified region (
ap-south-1).
kubectl config get-contexts | grep ap-south-1

- The
use-contextcommand switches thekubectlcontext to the hub cluster, ensuring subsequent commands operate within this cluster.
kubectl config use-context <hub-cluster-context>
- The last command confirms that the current
kubectlcontext is set to the hub cluster.
kubectl config current-context
Installing ArgoCD on the Hub Cluster
1. Install Argo CD
kubectl create namespace argocd
kubectl apply -n argocd -f https://raw.githubusercontent.com/argoproj/argo-cd/stable/manifests/install.yaml
This will create a new namespace, argocd, where Argo CD services and application resources will live.
2. Check if all the pods are up and running
kubectl get pods -n argocd

Configuring the ArgoCD API server
In a production environment, securing communication with the ArgoCD API server involves signing up for a certificate authority, creating a self-signed certificate, and configuring ArgoCD to use this certificate. However, for today's demonstration, we'll take a less intricate route by running the API server in insecure mode using HTTP.
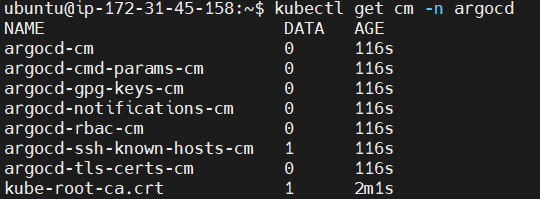
1. Get config map for namespace argocd
kubectl get cm -n argocd
2. Edit the config map of cmd-params using the below command
kubectl edit configmap argocd-cmd-params-cm -n argocd
3. Add a data in the bottom of the configmap
data:
  server.insecure: "true"
Save the above file with the changes.
4. Now to confirm that the api server is running in http, we will check the config using the below command
kubectl edit deploy/argocd-server -n argocd
Here you will notice the change we have added, which confirms server is running in http mode.
5. We will run argocd in NodePort mode instead of ClusterIP mode, for that just make a small change in the argocd server
kubectl edit svc argocd-server -n argocd
and change the type from ClusterIP to NodePort. Now run the below command to see the change in the type.

6. Now add the NodePort Ip to the security group of hub cluster.
7. Once added, copy the public ip of hub cluster with NodePort port and you will see argocd UI is up and running.
8. Now we will try to login to Argocd, but before that the initial password is stored in a secret file which we need to get it. Following commands can get you the password
kubectl get secrets -n argocd

Once this command is executed, we get 3 files inside this secret, wherein the argocd-initial-admin-secret is the file where our password is stored.
kubectl edit secret argocd-initial-admin-secret -n argocd
Now copy the password, and run the next command to decode it, as the password is base64 encoded.
echo (paste the password) | base64 --decode
Now copy the password without the % sign, that is your argocd password and username is admin.
Add Clusters into Argocd
Before we proceed with adding clusters through the CLI, let's ensure we are authenticated in the CLI using the ArgoCD username and password.
argocd login (URL with port number)

Currently, ArgoCD doesn't offer a direct UI function for adding clusters due to inherent complexities in the process. Instead, we'll leverage the CLI for this task.
Login to CLI:
- Ensure you are authenticated in the CLI using the provided command.
Adding Clusters:
- Use the CLI to add clusters, a process nuanced by configurations and authentication.
argocd cluster add (context path) --server (URL:port number)

You will get a message as cluster is added.
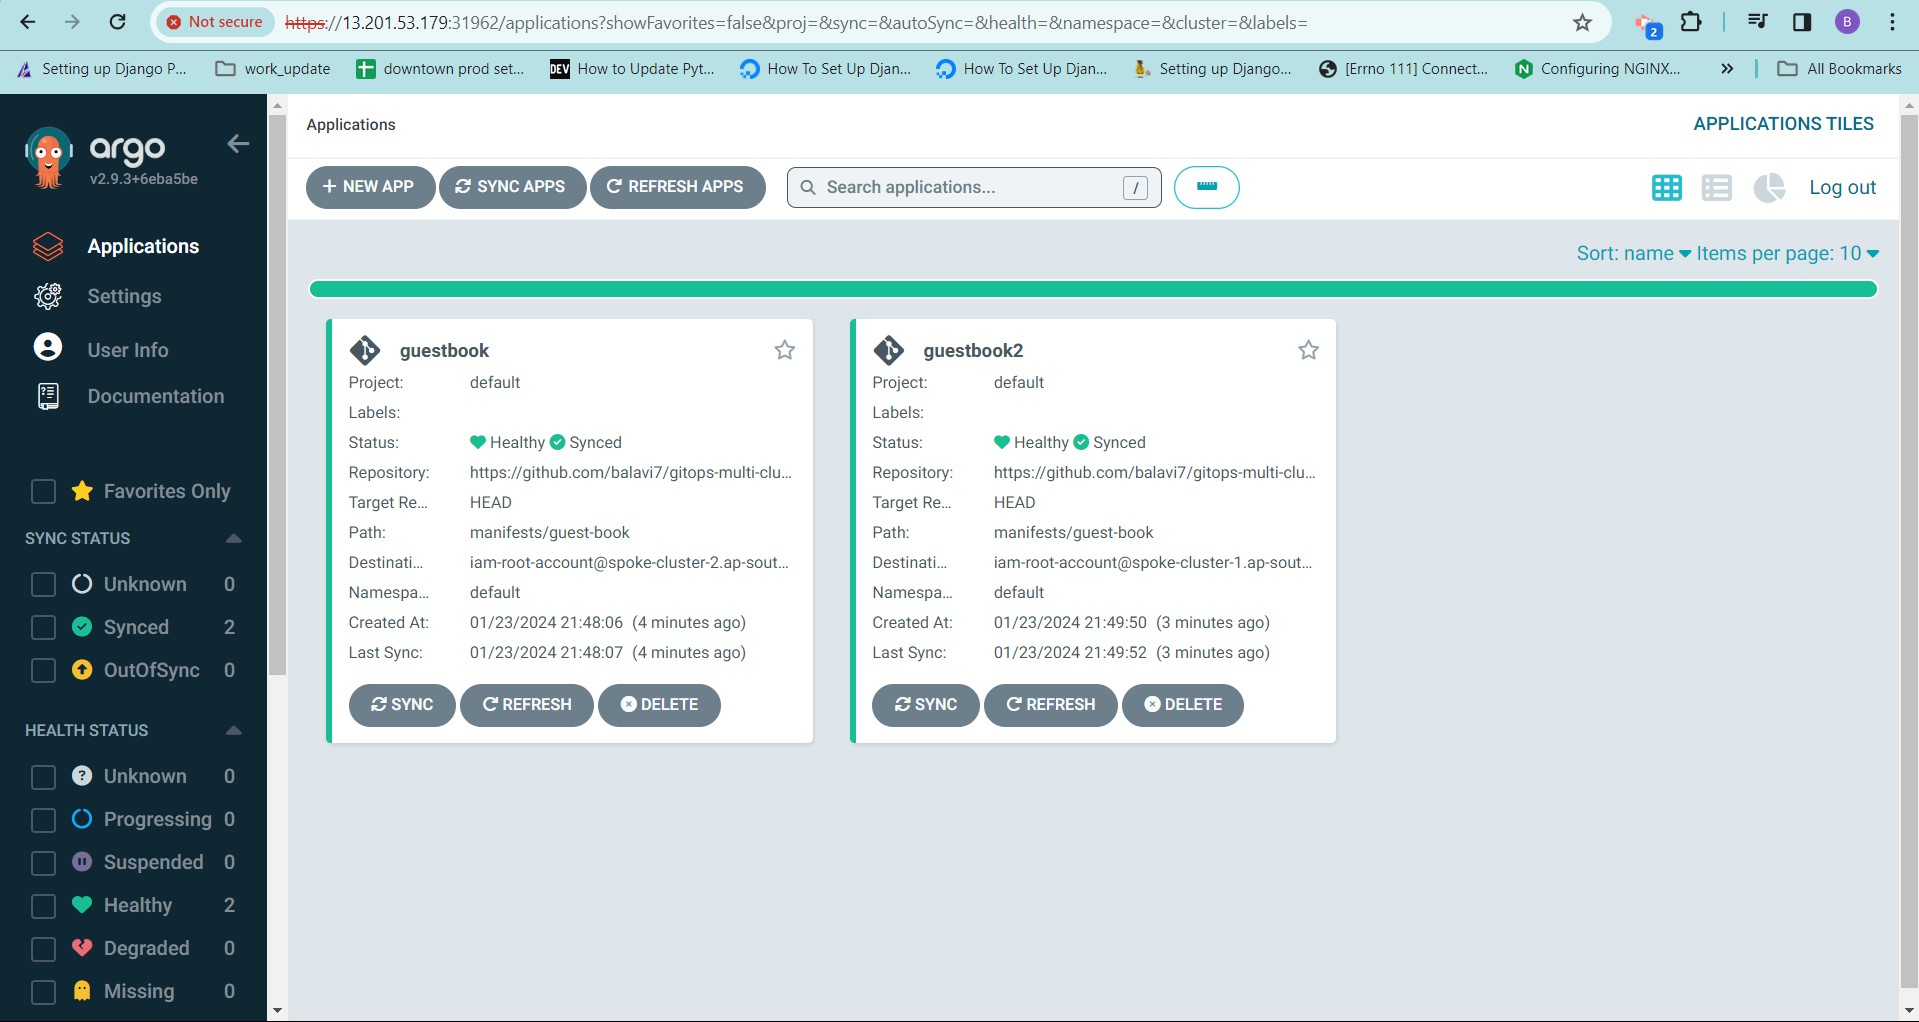
In the same way you can add multiple clusters to your Argocd, Once done go to the UI and click on refresh button to see all the clusters which have been added.
Creating Applications in ArgoCD
1. Access ArgoCD UI:
Navigate to the ArgoCD UI.
2. Navigate to Applications:
On the UI, locate and click on the "Applications" tab.
3. Add New Application:
Click on the "Create New Application" button.
4. Define Application Settings:
Application Name: Choose a unique name for your application.
Project: Select the project or create a new one.
Source Type: Choose "Git."
5. Git Repository Settings:
Repository URL: Enter the URL of your Git repository containing Kubernetes manifests.
6. Sync Policy:
Define the sync policy based on your deployment requirements.
7. Destination Cluster:
Cluster URL: Enter the URL of the target cluster where the application will be deployed, if you want to deploy in multiple cluster then you need to create multiple applications.
8. Deployment Configuration:
Configure deployment settings, such as namespaces, manifests, and any additional parameters.
10. Save and Sync:
Save the application settings and initiate the sync process.
Verifying Application Synchronization
1. Check Application Sync Status:
In the ArgoCD UI, navigate to the specific application.
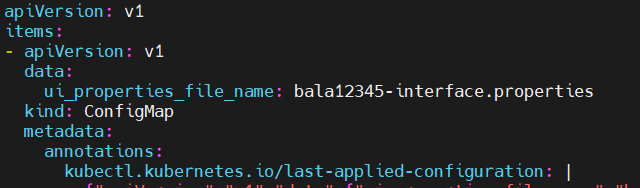
2. Git Repository Change:
Make a change to the configuration files in the Git repository, such as updating data in a ConfigMap.
3. Sync Application:
In the ArgoCD UI, trigger a manual sync for the application.
4. Verify Changes:
Use kubectl edit or similar commands to inspect the cluster resources and ensure they reflect the changes made in the Git repository.
5. Manual Configuration Change:
Manually update a configuration file in the cluster, such as modifying a ConfigMap.
6. Check Application Sync Status:
Observe that the application status in the ArgoCD UI shows "OutOfSync."
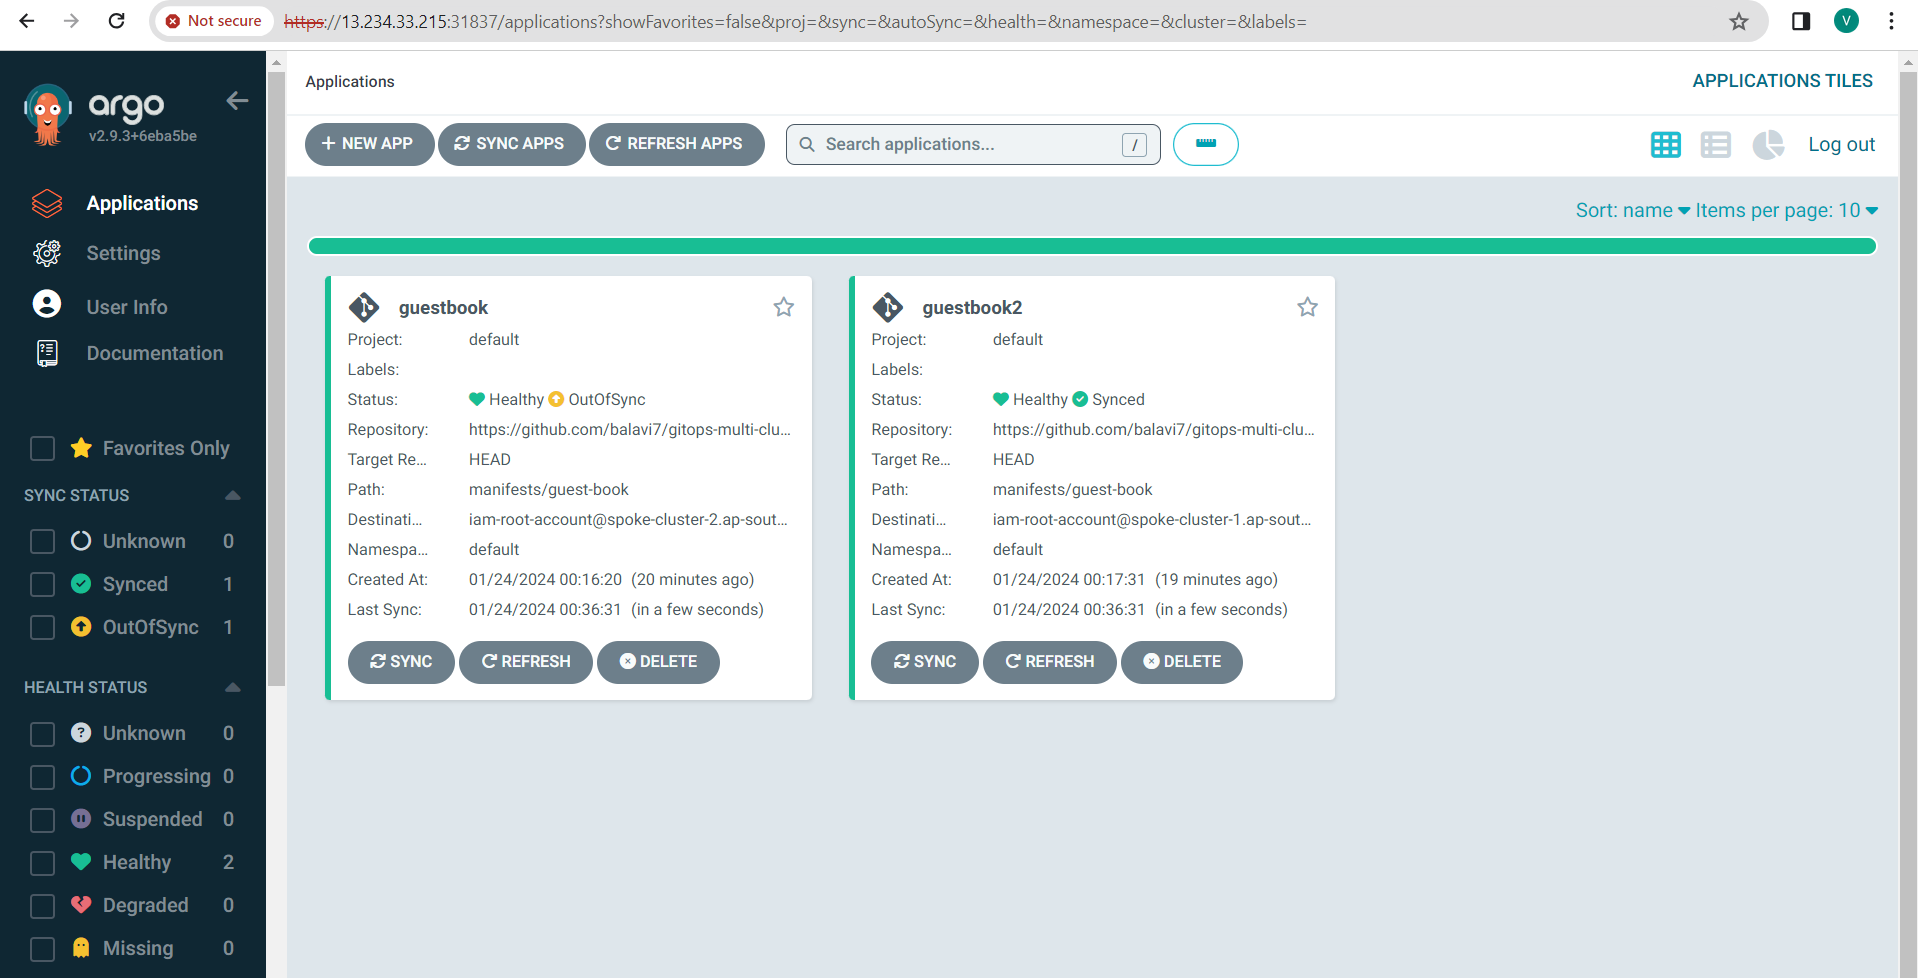
7. Sync Application Again:
Initiate another manual sync for the application.
8. Verify Restoration:
Confirm that the changes made manually are restored to match the desired state defined in the Git repository.
You've successfully tested and verified the synchronization capabilities of ArgoCD across your multi-cluster environment. The ability to detect changes, reconcile them, and maintain the desired state showcases the power and resilience of ArgoCD in managing complex deployments.
Conclusion
Congratulations! You've successfully defined, configured and deployed an application in ArgoCD. This application will serve as the focal point for orchestrating deployments across your multi-cluster environment.
If you found this demo insightful, don't forget to like, share, and repost! Thank you for joining us on this exploration of ArgoCD's multi-cluster capabilities.✨
Stay tuned for more deep dives into Kubernetes, GitOps, and cloud-native orchestration. 🚀🌐✨


