Multi Stage Docker File for Nodejs

Before understanding Multi stage docker, lets get a quick overview on what is DOCKER?
Docker is one of the most popular open-source application containerization platform that is used for developing, shipping and running applications using containers. Basically deploying, testing, or scaling an application’s functionality independently is made possible by the modularization of its functionality using Docker containers.
To execute several containers on the same OS, Docker makes use of resource isolation in the OS kernel.
When building Docker images, it's often necessary to install build tools and dependencies to compile your application. However, these build tools and dependencies can take up a lot of space in your Docker image, which can make your image larger than necessary. To solve this problem, Docker introduced multi-stage builds.
What is Docker Multi-Stage build?
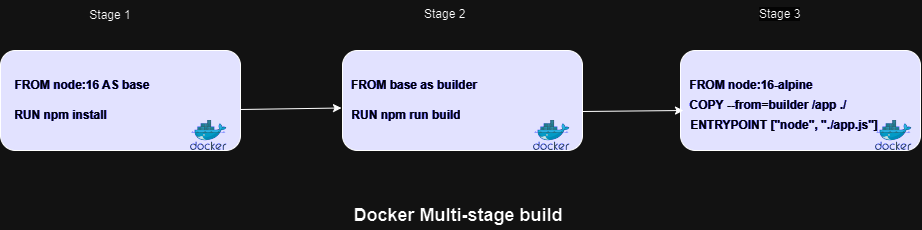
The multi-stage build is a feature that was introduced in Docker 17.05, that allow us to build smaller final container image by specifying multiple helper imagers (stages) within the same Dockerfile.
Multi-stage builds allow you to use multiple FROM statements in a single Dockerfile. Each FROM statement begins a new build stage, allowing you to build and package different parts of your application in separate stages. This can result in smaller and more efficient Docker images.
Let's Create a Multi-Stage build
Full Dockerfile for Multi-stage build for a nodejs application.
# base
FROM node:16 AS base

WORKDIR /usr/src/app

COPY package*.json ./

RUN npm install

COPY . .

# for build

FROM base as builder

WORKDIR /usr/src/app

RUN npm run build

# for production

FROM node:16-alpine

WORKDIR /usr/src/app

COPY package*.json ./

RUN npm install --only=production

COPY --from=builder /usr/src/app/dist ./

EXPOSE 3000

ENTRYPOINT ["node","./app.js"]
Explanation:
1. In the first stage it uses the nodejs image version 16 as the base image, sets the working directory where the application code will be copied, copies package.json files into the current working directory, install dependencies listed in package.json and copies the rest of the files from host machine to the current working directory.
2. In the second stage named as builder is based on the base stage(first), which allows you to reuse dependencies and code from previous stage, runs a build script defined in package.json to build the application.
3. In the third and the final stage we are using smaller and lightweight version of nodejs, copies package.json and install the dependencies listed in package.json. Then copies the compiled application code from the builder stage using the --from flag to the working directory of the final image. Exposes the port and sets the default command to run the when the container starts.
When building this Dockerfile, Docker will first build the first stage, then use the compiled files in the second stage. This allows us to keep the build tools and dependencies in the first stage, and only include the compiled files and runtime dependencies in the second stage. The resulting Docker image will be smaller and more efficient.
To build this Dockerfile, run the following command in the same directory as the Dockerfile:
docker build -t my-node-multistage .
This will build the Docker image and tag it with the name my-node-app. You can then run the Docker image using the following command:
docker run -p 3000:3000 my-node-multistage
This will start the Docker container and map port 3000 on the container to port 3000 on the host machine.
That's it! You now know how to create a multi-stage Dockerfile to build and package your applications more efficiently.
Thank you for reading!
If you found this article helpful, please consider liking and sharing it with your network.
Until next time, Happy Learning!


